SAAB Turbocharger DIY
Picture Thread for removing, installing, and priming MY2000 SAAB 9-5 turbocharger.
Before you start you need to have the proper tools for the job. For this job I find it helps to have a variety of extensions, metric sockets (7,10,12,13), torx sockets, ratchet wrenches, box wrenches, pliers, etc. If you don’t own these the money you’ll save doing this job yourself will pay for them many times over.


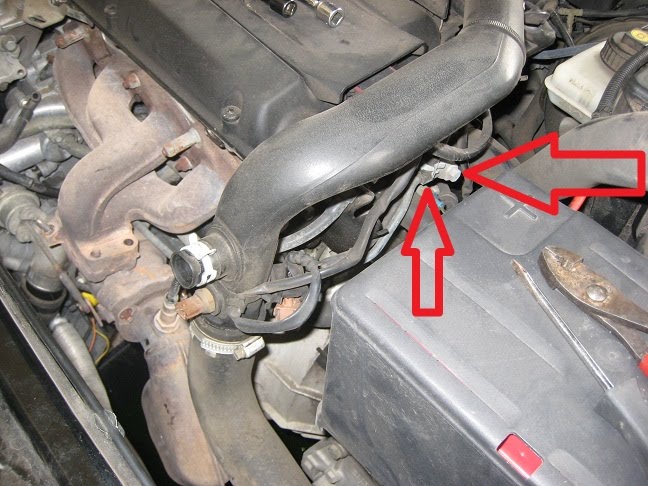
(1) Disconnect the Turbo bypass. You don’t need to disconnect the vacuum line from the turbo bypass valve, but merely place it aside once released.

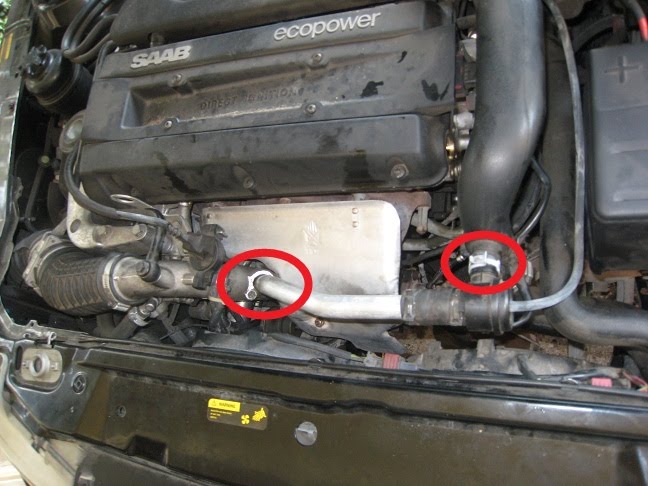
(1 cont.) This can be done by removing the clamp (arrow at bottom of picture) then remove the turbo bypass tube (one 10MM bolt and clip holding it into the Turbo intake Pipe/Cobra Pipe). Don’t lose that clip… it’s easy to do. Also don’t lose the O ring which seals it.
(2) Remove the Heat Shield (one 13MM nut on the stud indicated with an arrow). The top of the heat shield merely clips to the extended studs securing the exhaust manifold to the head.

(3)Disconnect the coolant hose from the top corner of the radiator and bend it aside. Coolant will spill out so be ready with a catch pan.


(4)Unplug the fan (two electrical connections) A small flat head screw driver can be used to pry the red clip up. Remove the fan (two 10MM bolts on the top corner of either side (not pictured). The fan can be tricky to remove it needs to be tilted and pulled out.


(5)Drain Coolant using green drain on bottom corner of the radiator. Use a catch pan and dispose of coolant properly.


(6)It’s not completely necessary, but I prefer to remove this intake air hose (two 7MM hose clamps).

(7)Next these lines need to be disconnected and moved aside.


(7 cont.)Disconnect turbo lines from Turbo compressor housing, waste gate, and cobra pipe. Also, wear rubber gloves (I ran out) then you won’t be spending the next week trying to get crud out from under your nails.

(7 cont.) Remove the boost controller (slide it off) and push it to the side.
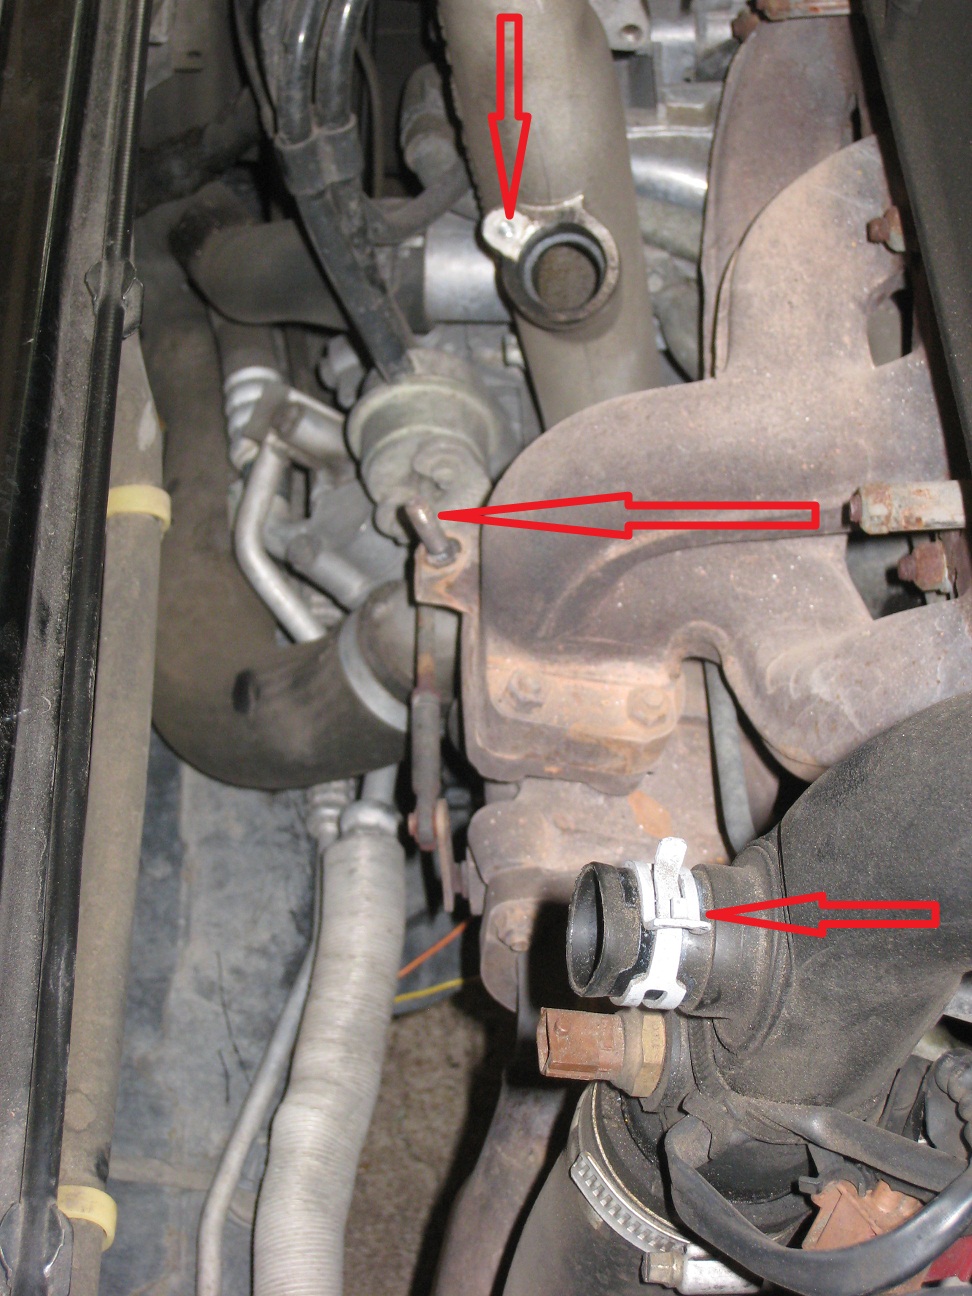
(8)The banjo bolt from the cobra pipe needs to be removed (don’t lose the copper washers) to move this to the side there is also a torx screw which secures it to the valve cover.


(9)Once you’ve removed the PCV line banjo bolt (13MM), loosen (no need to remove unless you want) the three 13MM bolts to prepare to remove the turbo intake pipe.


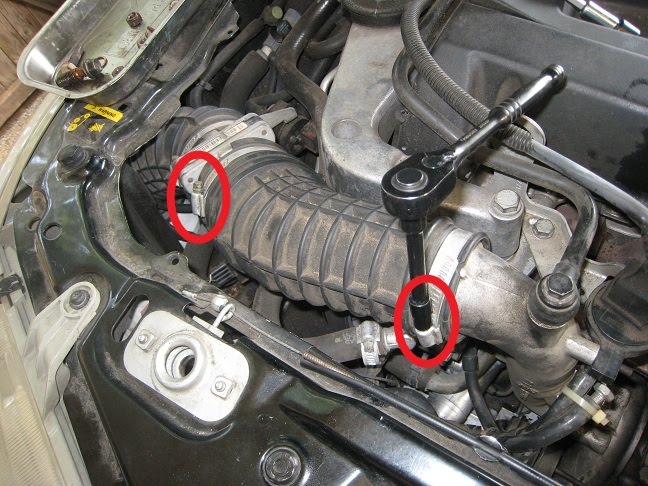
(10) Last step to remove the Cobra Pipe you must loosen the clamp which is between the turbo and the cobra pipe… to do this it requires a torx bit on an extension.
 (10 cont.) I find it easier to get to this clamp using a long extension as show here.

 (10 cont.) I find it easier to get to this clamp using a long extension as show here.
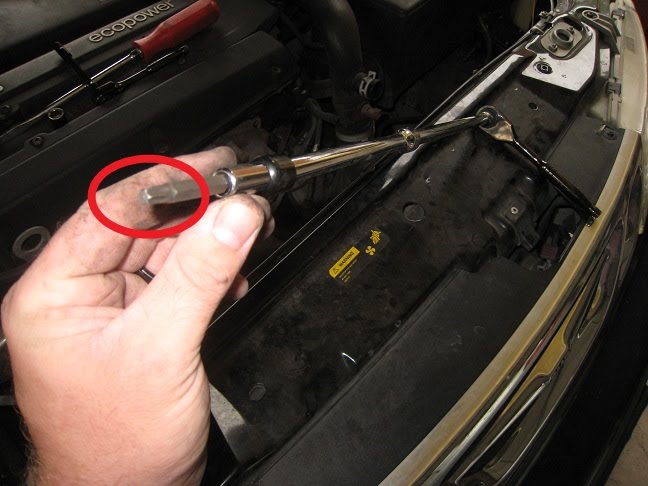
(11)Remove Turbo Intake Pipe (aka Cobra Pipe).


(12)Remove hose clamp (7MM) from turbocharger to intercooler hose. Bend hose aside.


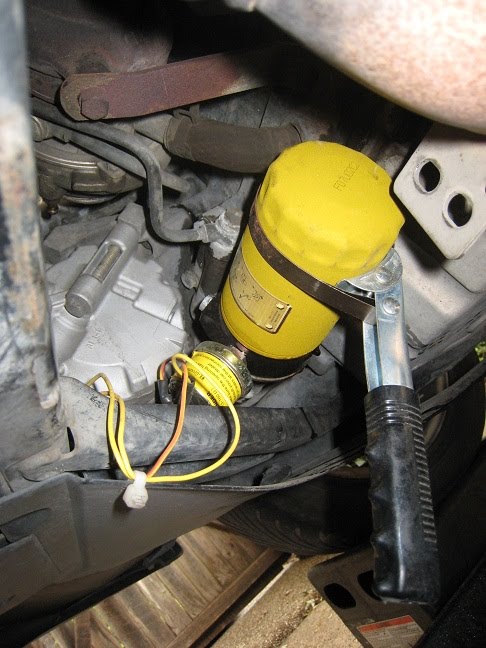
(13)Drain oil and remove the oil filter. I find this a good time to do an oil change with full synthetic oil and a premium filter (this is not the place to cut costs).

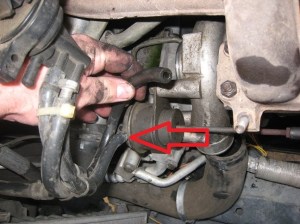
(14)Disconnect exhaust from Turbocharger (three 13MM studs + nuts). Don’t worry if the nuts come off or if the entire stud comes out they will go in the same way they come out. The bottom is the trickiest to get out.


(14 cont.)The bottom nut of the exhaust pipe can be the trickiest, but a ratcheting wrench is the best option to remove it. This picture is from underneath.

(14 cont.)Remove the exhaust pipe. If the exhaust pipe doesn’t move you may need to jump to step #20 and remove the bracket from underneath the car (on my car this was removed).


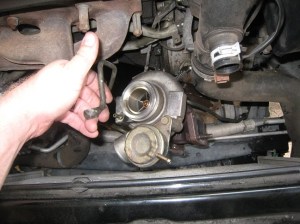
(15)Unbolt Turbocharger from exhaust housing (four 13MM studs + nuts). Again, don’t worry if nut comes off or entire stud with nut comes off they will go in just as they came out.


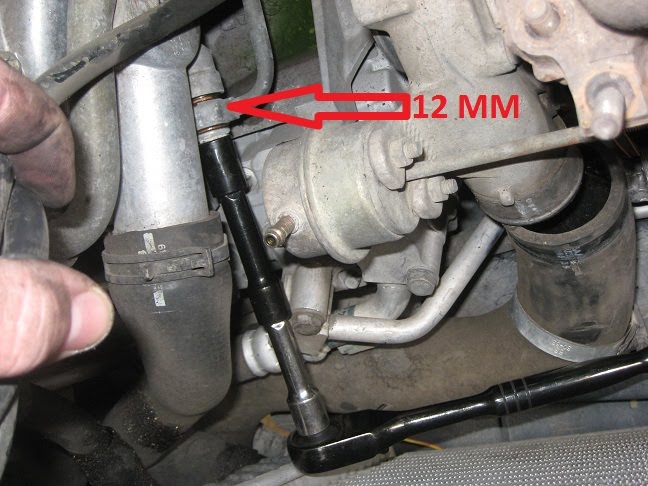
(16)Remove the coolant feed line banjo bolt (12MM) from directly beneath the water pump left of the turbocharger (left while standing in front of the vehicle). Don’t lose the two copper washers.

(17)This is the location of the 12MM banjo bolt and hose clamp for the coolant return line.

(17 cont.)Remove the 12MM banjo bolt from the turbo coolant return line and remove the rubber coolant line which has a hose clamp (circled in blue).


(17 cont.)Remove the 10MM bolt which holds the turbo coolant return line in place. It is located approx. halfway between the turbo and banjo bolt just removed.


The next several steps are from under the car.
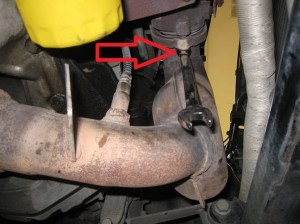
(18)Remove banjo bolt (12MM) from oil feed line located directly above the oil filter location. Don’t lose the copper washers.
(19)Remove the turbo bracket (two 13MM bolts)
(20)Disconnect the turbo oil drain line to sump (2 hose clamps),

(21)To remove the turbo drop turbocharger down.
 (21 cont.)The trickiest part of removing the turbo with the lines attached is the long coolant return line which can get caught up on the oxygen sensor line, etc. So once you get that free it isn’t much a problem.

 (21 cont.)The trickiest part of removing the turbo with the lines attached is the long coolant return line which can get caught up on the oxygen sensor line, etc. So once you get that free it isn’t much a problem.
(21 cont.)Careful not to damage the radiator when pulling the turbo.

(21 cont.)
 I did a turbo swap Mitsubishi for Garrett for this particular job, but the steps are identical for a direct replacement.
 I did a turbo swap Mitsubishi for Garrett for this particular job, but the steps are identical for a direct replacement.
Mitsubishi TD-04 (left) compared with Garrett GT-17 (right).
 Another comparison.

 Another comparison.
(22)Now that you’ve removed your old turbo install your new turbo it by following the reverse directions. Dealerships recommend replacing all gaskets, copper O rings, etc. although I have reused all with no problems.
(22 cont.)Refill coolant. Refill oil etc.

(23)Great, now that you’ve installed your new turbo you need to prime it so as not to do any damage to it. To do this follow the next steps.
(24) Unplug the Direct Ignition Cassette (DIC) which is located directly on top of the engine.
(25)Unplug fuse 19 for the fuel pump.

(26)Crank engine for several seconds (10 should do fine) so as to prime the turbo with oil.
(27)Plug everything back in and start her up. Depending on how long you primed the turbo it is normal to see some smoke coming from around the turbo area it is persists after everything is warmed up then check for leaks, etc.
Of course if you’ve followed these directions to upgrade your turbo you’ll want to flash your ECU to get everything out of the TD-04. Also a boost gauge is a very fun addition.

Enjoy your SAAB!
EDIT: July 8, 2012
Bruce Baldwin found this tutorial helpful and instead of lugging the computer out to the car he created a printable version. Great work Bruce… thanks for your contribution!

Do you have a link to the same procedure but for a v6 turbo? I’m really not looking forward to doing the job, but I can’t ignore the turbo any longer…
LUis
Sorry don’t have a picture DIY. There are a few differences, but mostly very similar. The big difference is the turbo from the V6 model has the exhaust manifold integrated into the turbo, so you have to unbolt the whole exhaust manifold or just replace the CHRA. If you do attempt this the one thing you’ll find in your way of the last exhaust stud is the oil dipstick tube, this can be removed, but it is usually stuck in there, so a pair of pliers and some twisting should make it give. Good Luck.
can you tell me where i can get a fuel pump, like the one you showed on youtube. i have a 2002 9-3 2.0l turbo. already pulled the bad pump out. any advice would be appreciated, thanks joe
Some sources are: http://www.thesaabsite.com, http://www.eeuroparts.com, or I’ve purchased some from http://www.rockauto.com NOTE: Walbro and Bosch are the exact same supplier and part. Often when you order a Bosch replacement part it comes in a Bosch box, but has Walbro stamped on the side when you pull it out of the box. A good price range is $65-85, but I wouldn’t pay much more than that. Don’t believe the lie that you have to purchase the entire assembly!!!
Great step by step. One question. I also removed the banjo bolt from the oil feed tube on the engine block end. So in my parts cleaner I now have four banjo bolts, three banjo bolts all the same size, one smaller. One of the three larger banjo bolts has fewer and smaller ports in it. Unfortunately, I did not pay attention when disassembling. How can I determine which banjo bolt goes where?
The small banjo with the smaller holes goes on the side of the cylinder head near the thermostat.
You say you did the swap from GT17 to TD04. Aside from the turbo itself, what else did you need to replace. i.e. water lines, pipes etc… Is it a direct replacement or do you need other different hardware?
Do you have any history repairing or replacing the 9-5 radio and amp?
Nope. Best place to go for all audio issues is http://www.angrykitchenappliances.com
Concerning point 27 (smoke from around the turbo), if this persists for longer than a few hours of driving, what points on the turbo should I check for leaks? I don’t see any evidence of leaking oil or coolant from around the bolts/washers when the car is cold. Do these leak only under pressure and then immediately burn off the leaked fluid because of heat?
do i need to install a intercooler after upgrading to td 04, and doea it has to be a mitaubishi? what about the other brand? are they the same?
Nope no intercooler needed. You of course have the stock intercooler on the car. Some choose to upgrade to either a front mount intercooler setup- of course this is aftermarket. The other option is a higher flow/efficiency intercooler made by tuners (ECS).
I have some smoke on acceleration right after start up. Goes away when warm. Black soot on exhaust that comes back a day or two after cleaning. I figure I am blowing oil through the turbo. I am getting power loss at WOT and thought the clutch was going but then found it might be the catalytic converter being stuffed up (also only about 21.5mpg) and also giving bad readings to the cpu because its shot since its been having oil fed to it via the turbo. I figure I need to rebuild the turbo before replacing the cat but do I also need to replace the intercooler? I’m worried it might be plagued with a bunch of oil as well. What size FMIC would you replace it with if it needs to be replaced? I have a stage 2 tune and have no aspirations for HP beyond 300.
Yes sounds like your turbo is leaking oil. You should be okay just replacing the turbo your cat may even burn out the excess oil in there. If you do think you should replace the intercooler it’d be easiest to go OEM replacement.
Thanks for your reply. I will buy a rebuild kit today.
My friend is working on my 2000 Saab 9-3. He told me to find the o ring that goes in between the turbo and the exhaust, do you happen to have a part number for me? Thanks
There is no such o-ring between the turbo and the downpipe exhaust. If you mean the copper square gasket between the exhaust manifold and the turbo that can be found looking at eeuroparts.com
Got my turbo out and rebuilt. I have an off white residue on the turbine side as well as in the curves of the exhaust manifold and in the curves of the downpipe and clogging 65% of the catalytic. This stuff is very hard and is baked onto the sides. No solvent even touches it and I had to sandpaper it off of the inside of the turbo.
https://picasaweb.google.com/107238671950065164765/Saab02?authuser=0&feat=directlink
Theres a link. I hope you can take a moment and give your advice.
A saab mechanic thought perhaps it is coolant coming in via a leak to the compressor wheel and going through the engine then vaporizing on the hot curves of the exhaust but I dont replace coolant. I DO go through a lot of oil, but I think thats why I’m replacing the turbo to begin with.
Pingback: 9-5 Turbo compatibility: '01 Aero in '02 Linear?